On this page
The map builder opens as one studio: the rail of tools down one side, the tool's panel beside it, the bar above the map, the map itself (see Map Canvas), and the inspector, which opens in a column beside the map when you choose something on it. This page explains how these parts work, since every tool uses them the same way. Each tool has its own page, listed at the end.
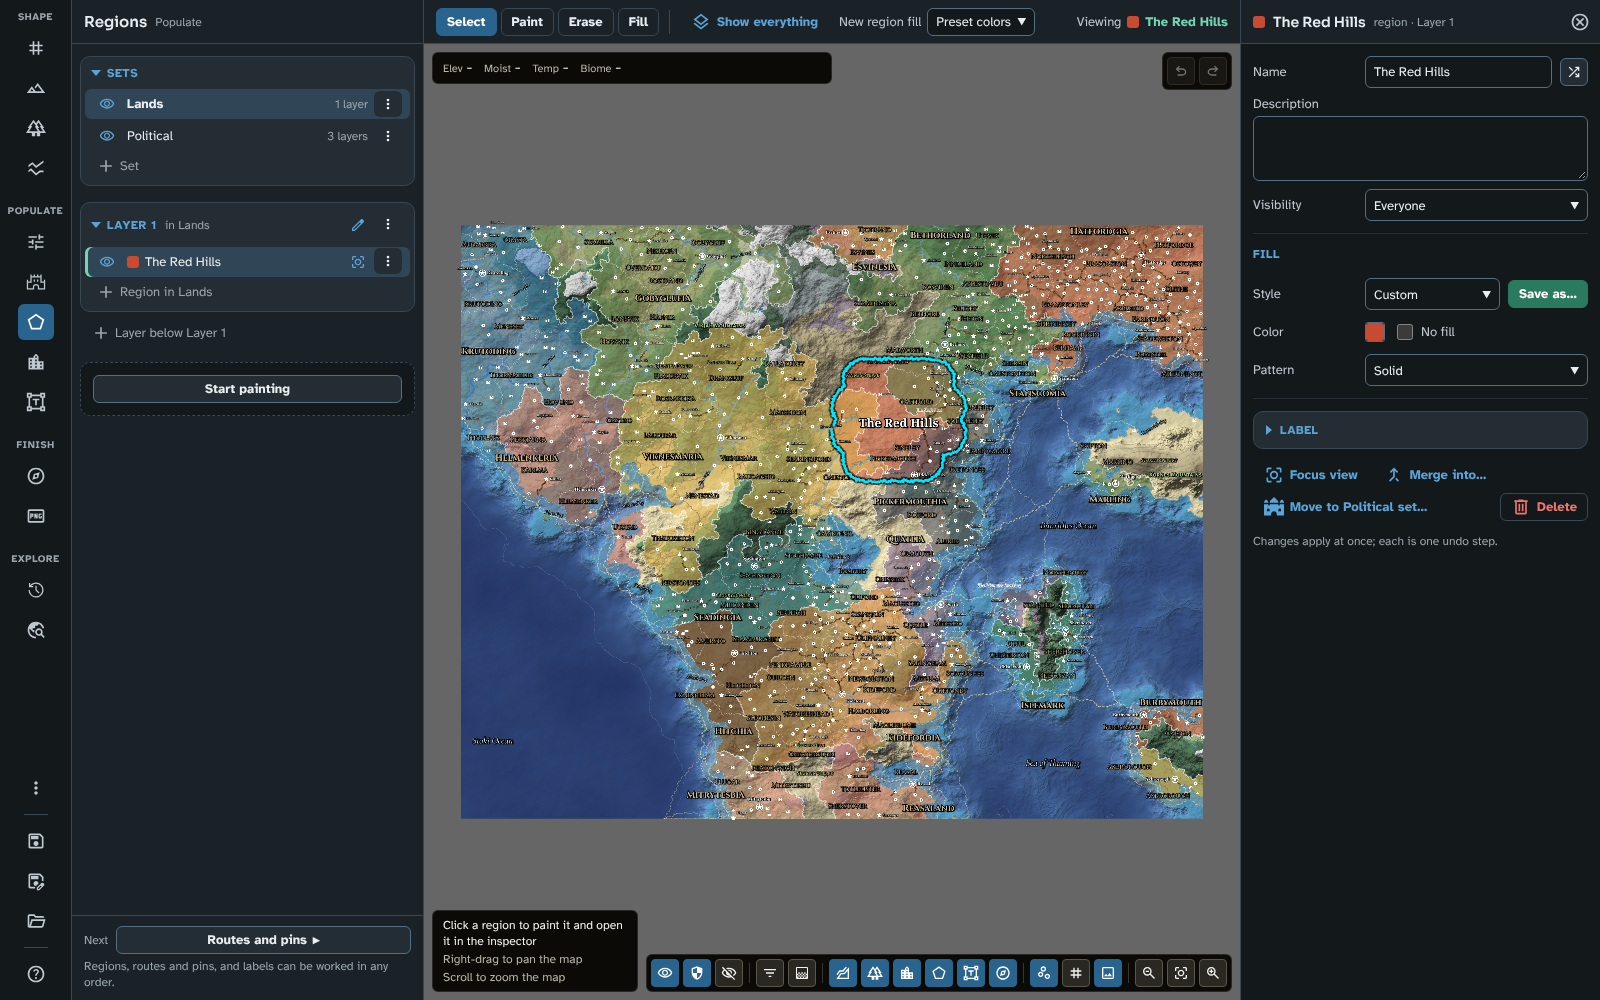
The studio: the rail (left), the Regions panel, the bar (top), the map, and the Red Hills in the inspector (right).
The rail
The rail holds the tools in the order you usually make a map, in three stages, then a stage of its own for looking back:
- Shape: New map, Terrain, Biomes and Rivers and faults. These make the land itself, and each one builds on the one before.
- Populate: Influences, Generate, Regions, Routes and pins and Labels. These place what sits on the land: Generate does it in one run (steered, if you wish, by the influences painted before it), and the other three by hand. You can work them in any order.
- Finish: Cartography and Export.
- Explore: History, to see the map as it was in earlier ages, and Travel, to see how long journeys take. They are not part of the order of work: no Next leads to them.
Below the stages is a group of occasional tools and views:
- Reference image (see Reference image).
- Styles and icons (see Styles and icons).
- Appearance, a menu that chooses the studio's Mode (Auto, Light or Dark) and Hue (Gold or Teal). A choice applies at once and the menu stays open, so you can try each one. The button's name says what is chosen ("Appearance: Dark, Teal"). See Module Settings.
- 3D view, which shows the map in 3D. Press it again to return to the flat map.
- Full screen (web only), which takes the page in and out of full screen.
Then come the file actions:
- Save map, which saves the open map. A dot on it, and "(unsaved changes)" in its name, show that the map has changed since it was last saved.
- Save map as…, which saves the map under a new name and makes the copy the open map.
- Maps, the tool that loads, renames, duplicates, exports, imports and deletes saved maps (see Maps).
Help sits at the very foot of the rail (see Help).
The active tool's button is marked. Every button is an icon with a tooltip naming it.
When the window is narrow or short
- Narrow: when the studio is less than 1,400 pixels wide, the rail, panel and inspector become narrower and the rail hides the stage names (the buttons stay in their groups). In the lists of pins, routes, regions and labels, a row's actions then show only on the row you point at, the row with focus and the chosen row (see Lists).
- Short: when the whole rail does not fit the studio's height, the occasional group folds into a More tools button, whose menu lists the same tools with the Mode and Hue choices of Appearance inline. On a very short studio, Save map, Save map as… and Maps fold into the same menu as a Map files group; More tools then shows the unsaved-changes dot itself. Help never folds.
In Foundry the studio is a window, so these follow the window's size rather than the screen's.
Keys
With focus on the rail, the arrow keys move from button to button, and Home and End go to the first and last. Enter or Space presses the button.
The panel
The panel shows the active tool's settings and lists.
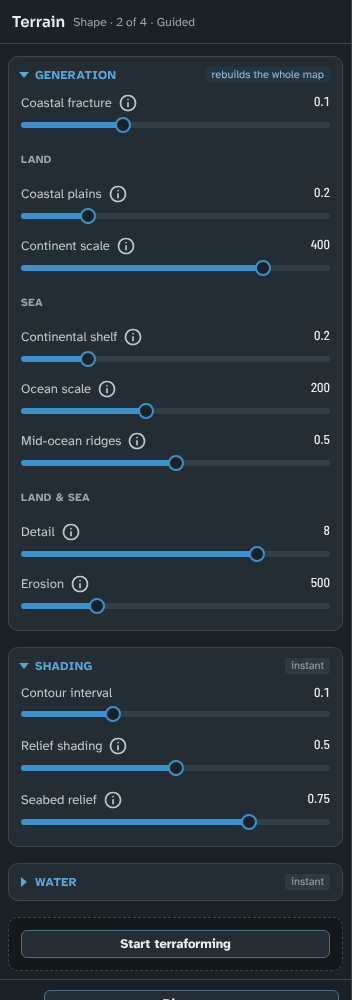
A panel: Terrain's header, its sections with their badges, the state block and Next.
The header gives the tool's name and its place in the order of work, for example "Shape · 2 of 4 · Guided". Shape and Finish tools are numbered; Populate and Explore tools are not, since you can work them in any order. New map and Terrain also name the map's engine.
Sections
A panel's settings are grouped in sections. Click a section's title to fold or unfold it; the studio remembers which sections you have folded. A section's title can carry:
- A cost badge, saying what changing its settings costs:
- creates the map: nothing happens until you create a new map with these settings.
- creates a new map: the section makes another map (a regional map).
- rebuilds the whole map: the terrain is generated again, and everything that depends on it (climate, biomes, rivers) is worked out again. On a large map this takes a few seconds.
- rebuilds climate and biomes: the terrain is kept, and the temperature, moisture and biomes are worked out again.
- rebuilds rivers: only the rivers are worked out again.
- instant: the map is only redrawn.
- A count, for a list, of how many items it holds.
- Buttons for the list: + to add an item, or Select items for mass edit (see Mass edit).
The sliders in a panel return to the map's default when you double-click them.
While you edit
While a brush is in use (terraforming, painting biomes, drawing land masks and so on), the sections whose settings would regenerate the map are dimmed and take no input, with a line saying why, such as "Paused while terraforming.". Stop editing to change them.
Start and Stop
Below the sections, a tool that changes the map has a button to start editing, named for what it does: Start terraforming, Start painting, Start drawing, Start placing or Start cropping. While you edit, the block shows what you are doing and what you are working on (for example "Painting" with the region's name), and the button becomes Stop painting (and so on). You can also start editing from the bar (see below). Cartography has no such block: its decorations can be picked or moved at any time.
Next
At the foot of the panel, Next names the tool that comes next in the order of work, with a line saying why (for example, under Terrain: "Biomes read the terrain: settle sea level and relief first."). Click it to go there. Export is the last tool, and History, Travel and the occasional tools have no Next.
The bar
The bar above the map holds the active tool's modes, the settings of the mode in use, and a readout.

The Routes and pins bar in Route mode, while drawing.
- Modes decide what the pointer does on the map, for example Select, Paint, Erase and Fill in Regions, or Raise, Lower, Smooth and the other brushes in Terrain. The arrow keys move between the modes of a group. Hover over a mode for a longer description.
- Settings follow the modes: the few settings of the mode in use, such as the brush's Size, Strength and Feather, a route's Transport, or the Style the next object gets.
- The readout at the end of the bar says what you are doing: Viewing, or while you edit the state word and the object you are working on.
Choosing a mode starts editing. You don't have to press Start first: choosing Paint in Regions or Raise in Terrain starts editing straight away. When you stop editing, or change tool, the tool goes back to Select.
Select is on the bar of every tool that has things on the map to choose: regions, routes, pins, labels, rivers and faults, a Guided map's land masks, and decorations. Select changes nothing: clicking an object opens it in the inspector, clicking empty ground or pressing Escape lets go of it. A double-click on an object also opens it.
The bar always stays on one row. When there is not enough room it folds, in this order:
- The least used modes move into a More menu at the end of their group.
- The modes not in use show only their icons.
- The sliders' names give way to icons.
The mode in use always keeps its name.
The canvas hint (see Map Canvas) lists what the pointer and keys do in the mode you are in. Press ? at any time for the full list of keyboard and mouse shortcuts, by tool and mode; it is also in Help under Shortcuts.
The inspector
The inspector shows the fields of one object: a region, route, pin, label, river, fault, decoration, land mask, layer or layer set, one of your styles, a culture, or a custom biome. Anything made by Generate also has a Generated section with its figures, what generating again will do with it, and Lock. It opens in its own column beside the map, so it never covers the map.
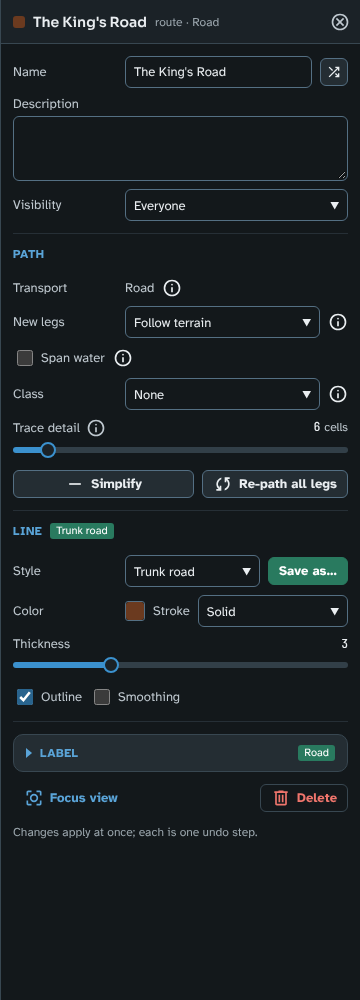
A route in the inspector: its header, then its Path, Line and Label groups.
Opening it:
- Click an object on the map with Select, or double-click it.
- Click its row in a list in the panel (or move to the row and press Enter).
- A new object opens in the inspector as soon as you place or draw it (a pin, a label, a route once finished, a river, fault or land mask as you start it, a new region or layer), while the map keeps the pointer so you can go on placing or drawing.
Opening another object replaces the one shown. The header shows the object's colour, its name, and what kind of object it is with its context (for example "region · Kingdoms", "route · Road" or "layer · Regions").
Changes apply at once. There is no Save or Cancel. Each field applies when you finish with it: a list or tick box at once, a text field when you press Enter or leave it, a slider when you let go, a colour when its picker closes. Each change is one step of undo, so Ctrl+Z (or the undo button) takes back exactly that change. Ctrl+Z works while the inspector is open; the inspector follows the undo, and closes if the object is undone away.
Sliders: double-click a slider to put back the value it had when the inspector opened.
At the foot of most objects:
- Focus view pans and zooms the map to the object.
- Delete deletes it (one step of undo).
- A region also has Merge into….
- A label that belongs to a pin, route or region says so and has Go to its owner, which switches to the owner's tool and opens the owner in the inspector.
Closing it: press Escape (with focus in the inspector), click its close button, click empty ground with Select, or change tool.
Help opens in the same column. Closing Help brings back the object the inspector showed.
When the studio is less than 1,400 pixels wide, the inspector is narrower and stacks each field under its name.
Lists
Every list in the panels works the same way: pins, routes, labels, rivers, faults, decorations, land masks, the region lists, custom biomes, styles and custom pin icons.
- Click a row to open it: in the inspector, or for a custom pin icon, in its dialogue.
- The marked row is the one the inspector shows, so you can see where you are in a long list.
- Row actions are shown at the row's end, for example Toggle visibility, Focus view, Delete or a More options menu. Pressing one does not also open the row. In a studio less than 1,400 pixels wide, the rows of pins, routes, regions and labels show their actions only on the row you point at, the row with focus and the chosen row, over the end of its name, so the names keep their room.
- An empty list says how to fill it.
- Moving a row: the Land masks list keeps its own order, which decides which mask lies on top. Drag a row's grab handle up or down the list, or press Up or Down on the handle, to move it (see New map).
Long lists: the Pins, Routes and Labels lists, which can hold thousands of items after a run of Generate, have a search field (Search by name), a Made by filter (Any origin, Generated or Hand-made) and a filter by kind (pins by their kind of place, routes by their transport, labels by what they belong to, or With no room). While a search or filter is on, "12 of 2,784 match" says how many rows it leaves. Generated rows in the Pins, Routes and Regions lists have a lock button, which keeps the item when you generate again.
Keys: each list is one stop for the Tab key (its marked row, or its first). Up and Down move through the rows, Home and End go to the first and last, and Enter opens the row. Moving never opens anything, and focus stays in the list when a row opens in the inspector, so you can step through a list with Down and Enter and watch the inspector follow. Tab then goes through the row's own buttons to the next list.
Naming rows: lists you add to by name (the Regions lists, the Cultures list and the style lists in Styles and icons) end with an add row, such as + Region in Kingdoms or + Route style. Clicking it opens a naming row with a free name ready: type a name and press Enter (or leave the field) to make the item, which then opens in the inspector; press Escape, or leave the name empty, to make nothing.
Styles
Pins, routes, labels and region fills each have named styles (pin styles, route styles, label styles and region fills). A style sets the look of everything that uses it, and changing the style changes them all.
- In the inspector, an object's Style picker shows the style it follows, or Custom when its look is its own. Changing a field the style sets makes the object Custom. Save as… makes a new style from the object's look and connects the object to it.
- On the bar, the Style (or Pin style) setting is the style the next object gets.
- The styles themselves are listed, made, renamed, duplicated and deleted in Styles and icons, and edited in the inspector.
Mass edit
Mass edit changes several items of one kind at once. It shows the same fields as the inspector, so anything you can set on one pin, route, region or label, you can set on many.
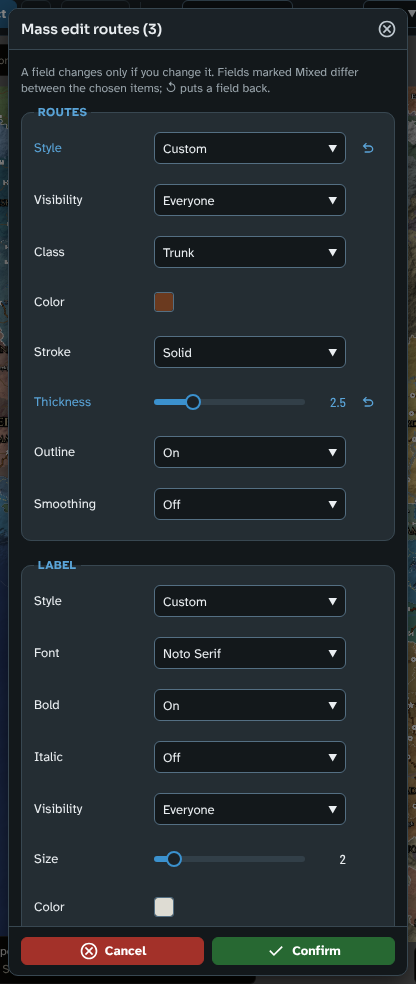
Mass edit for three roads, with Thickness changed and its reset button beside it.
Choosing the items
Mass edit is offered for:
- Pins and Routes, in Routes and pins. You can choose pins or routes, not both at once.
- Labels, in Labels. Only standalone labels (those you placed yourself) can be chosen; the labels of pins, routes and regions are changed with their owners.
- Regions, in Regions, one layer at a time.
To start:
- For pins, routes or labels, press Select items for mass edit in the list's title. For regions, open the layer's Layer options menu (in the layer's heading) and choose Edit several regions….
- A tick box appears on each row, with Select all and Select none above the list. Tick the items you want. Select all takes every item that matches the list's search and filters (in Regions, the regions the list shows).
- Press Mass edit (n), where n is how many items you have ticked. For pins, routes and labels, Delete (n) beside it deletes the ticked items instead, after asking, as one step of undo.
To stop choosing without changing anything, press Select items for mass edit again (or Done in Regions). Changing tool also ends the choosing.
The dialogue
The dialogue (for example "Mass edit routes (3)") shows the item's fields, then, for pins, routes and regions, their Label's fields, in the inspector's order and with its names. The fields that belong to each item alone are not offered: names, descriptions, a label's text and rotation, and a route's New legs, Span water and Trace detail.
When it opens, each field shows the value the chosen items share, or Mixed where they differ:
- A list (such as Style, Stroke, Pattern, Class, Justify, Font or Visibility) offers Leave as is first.
- Bold, Italic, Outline and Smoothing are Leave as is, On or Off.
- A slider sits at the first item's value and reads Mixed until you move it.
- A number field is empty, marked Mixed.
- A colour shows a split swatch.
A field changes only if you change it. A field you touch is marked as changed and shows a reset button (↺, named Leave as is), which puts the field back as it opened. Choosing Leave as is again, or emptying a number, is not a change.
Confirm writes the changed fields, and only those, to every chosen item, as one step of undo, and ends the choosing. Cancel changes nothing and keeps your choice, so you can try again.
Styles in mass edit
Styles work as they do in the inspector. Picking a style fills the fields it sets (marked as changed) and connects every chosen item to it. Changing a field the style sets by hand moves the Style to Custom, and the items become Custom when you confirm.
| Stage |
Tool |
What it is for |
| Shape |
New map |
Starting a map (engine, seed, size, latitude, area factor), a Guided map's land masks, and regional maps |
| Shape |
Terrain |
The terrain's generation, shading and water, and the terrain brushes |
| Shape |
Biomes |
Climate and moisture, biome colours and custom biomes, and the biome brush |
| Shape |
Rivers and faults |
River sources, custom rivers, tectonic features and hydrology |
| Populate |
Influences |
Painting where the land should feed more or fewer people, or be safer or more dangerous, to steer Generate (optional) |
| Populate |
Generate |
Settlements, routes and realms made in one run, through one or more ages, and the map's Cultures |
| Populate |
Regions |
Layer sets, layers and the regions painted on them |
| Populate |
Routes and pins |
Pins, and routes found between waypoints |
| Populate |
Labels |
Every label on the map, and labels of your own |
| Finish |
Cartography |
The scale bar, border, grid and decorations (a compass rose, a cartouche or images of your own) |
| Finish |
Export |
Image export, and in Foundry export to a scene |
| Explore |
History |
The map as it was in its earlier ages |
| Explore |
Travel |
How long journeys take from a place, by land, river and sea |
| More tools |
Reference image |
An image to trace over |
| More tools |
Styles and icons |
Styles, pin icons, and sharing them with another map |
| More tools |
Maps |
Saving, loading and sharing maps |
| More tools |
Help |
Version, links, shortcuts and acknowledgements |
See also: Getting Started for a walkthrough of a whole map, and Where did it go if you are used to version 3.