On this page
Map Canvas
The canvas is the large area of the studio that shows the current map, between the tool's panel and the inspector, below the bar. Four small overlays sit in its corners, and stay clear of each other at any window size:
- Top start (top left, or top right in a right-to-left language): the information bar.
- Top end: Undo and Redo.
- Bottom start: the canvas hint.
- Bottom end: the map controls.
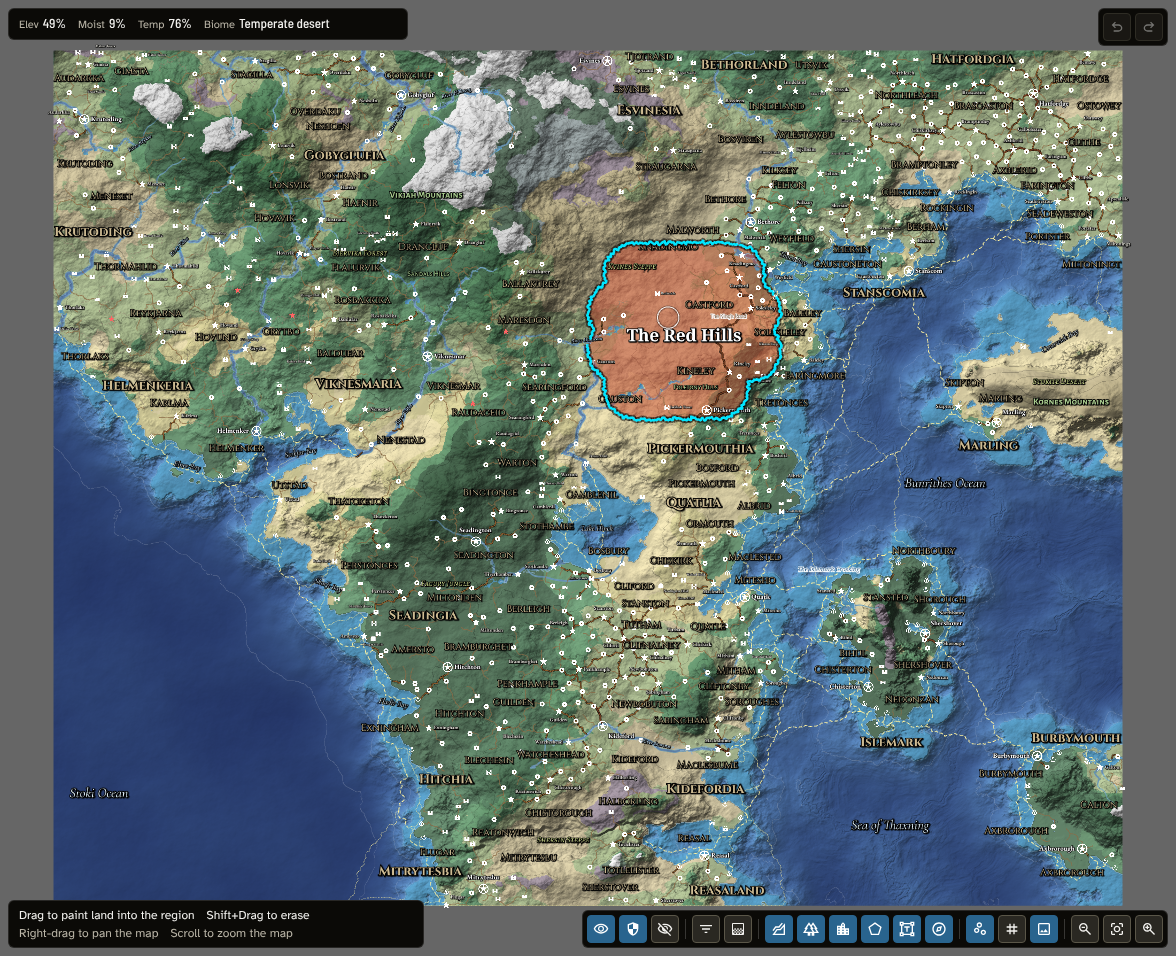
The map's overlays: the information bar (top left), undo and redo (top right), the hint for the Regions tool's Paint mode (bottom left) and the map controls (bottom right).
Moving around the map
- Pan: hold the right mouse button (or the middle button) and drag.
- Zoom: scroll the mouse wheel, or use Zoom out and Zoom in in the map controls.
- Reset view: the button between the zoom buttons fits the whole map in the canvas.
- On a touch screen: drag with two fingers to pan and pinch to zoom (see Using a touch screen).
Focus view in a list row or in the inspector zooms to that object and briefly outlines it.
The margin round the map: in Rivers and faults, Regions, Routes and pins, Labels and Cartography the canvas also shows a margin beyond the map's edges, since what those tools place can run past the edge: a fault or a route can start beyond it, and a regional map keeps the places just beyond its crop so its roads lead somewhere. What lies in the margin is never exported, and a place beyond the edge keeps its name off the map.
As you move the pointer over the map, the information bar shows the values under it: Elev (elevation), Moist (moisture) and Temp (temperature), each as a percentage, and the Biome. While a thematic layer is shown, its value under the pointer follows them, in the bar's accent colour, and each shown layer's legend sits below (see Thematic layers).
Undo and redo
The Undo and Redo buttons step back or forward through the edits you have made to the map, whichever tool you made them in.
- Each button's tooltip shows how many steps are available, for example "Undo (4)", and the button is greyed out when there is nothing to undo or redo.
- Hover over Undo or Redo to see which area of the map the next step would change, outlined on the map.
- Keys: Ctrl+Z to undo, and Ctrl+Shift+Z or Ctrl+Y to redo (on a Mac, Cmd instead of Ctrl). They work with the inspector open, but not while you are typing in a field.
- The history covers only the edits made since you opened the map. Loading a saved map always starts with an empty history.
The canvas hint
The hint lists what you can do with the mouse and keyboard at that moment, one action per item, growing upwards. The actions of the tool and mode you are using come first (for example "Drag a decoration or the scale bar to move it"), and moving the map ("Right-drag to pan the map", "Scroll to zoom the map") follows in a fainter ink. Each action names what it acts on, so each reads on its own. On a Mac, use Cmd wherever the hint says Ctrl.
While you hold a pin, label, decoration or land mask with the mouse, the hint changes to show what you can do with it, such as scrolling to rotate a label or Shift+Scroll to resize it.
Using a touch screen
The map builder works with a finger as well as a mouse, in Foundry and on the web. On a screen whose main pointer is a finger, the hint words each action for a finger ("Tap to place a pin", "Pinch to zoom the map").
- Tap for a click, and drag with one finger for a drag: painting, drawing, placing and moving work as they do with the mouse.
- Two fingers pan the map and pinch to zoom it, in any tool. Where a finger has nothing else to do (outside edit mode, with no crop or reference image taking the pointer), one finger pans too.
- Press and hold for a right-click: it finishes a line, a land mask or a route.
- Double-tap for a double-click.
- Hold a label, decoration or pin with one finger, then twist a second finger to turn it or pinch to resize it.
- The information bar shows the point you last touched, since a finger cannot hover. For the same reason, Travel draws the way to the point you last touched.
A few actions still need a keyboard: Shift, Ctrl or Alt with a click or a drag (adding or deleting a point, splitting or joining a route, painting and erasing a region in one stroke, moving a whole land mask) and Shift+Scroll on the reference image. A tablet with a keyboard attached can use them as usual. A touch screen laptop used with its mouse or trackpad shows the mouse's wording.
The map controls
The map controls in the bottom end corner decide what the map shows, and so what an export will contain (see Export). Every toggle shows whether its layer is on, however it was changed. From start to end:
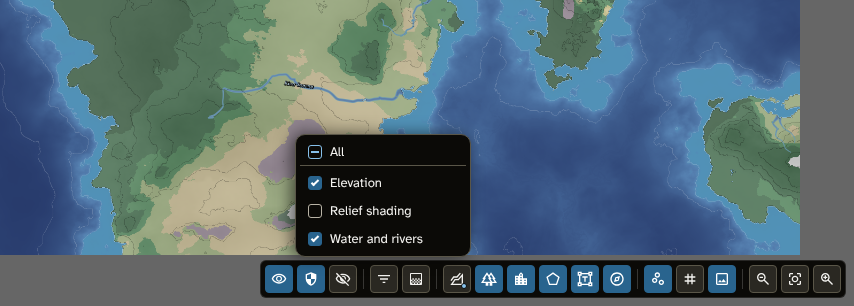
The map controls with the Terrain layers menu open and Relief shading off.
-
View filters: Player view shows the items visible to everyone, GM view the items set to GM only, and Hidden the items set to hidden (off when the map opens, so hidden items are out of sight until you want them; with it on you can also pick them on the map). The filters change only what you see while you work: an export always leaves hidden items out.
-
Detail and Thematic layers:
- Detail: how much of the map's content is shown, whether names avoid each other, and how large pins and names are drawn (see Detail level). Its tooltip names the level ("Detail: Regional").
- Thematic layers: what the generator's last run left on the map, drawn over it as colour and as trade lines (see Thematic layers).
-
Terrain layers and Biomes: each opens a list of its layers, which you can switch on or off one at a time, or all together with All:
- Terrain layers: Elevation (the ground's height, and the depth of the water), Relief shading and Water and rivers.
- Biomes: Land (land biomes, and biomes that sit on the water such as Pack ice) and Sea (biomes on the seabed).
A button is fully lit when all its layers are on, and partly lit when only some are. Press Escape or click elsewhere to close a list.
-
Routes and pins, Regions, Labels and Decorations (the scale bar, border and decorations from Cartography). Regions and Labels each open a list (see The Regions and Labels menus).
-
Contours (including the shoreline round the sea), Grid and Reference image.
-
Zoom out, Reset view and Zoom in.
Every terrain and biome layer is on when a map opens; these layers are not saved with the map. Choosing a tool switches on the layers it works on: Terrain switches on Elevation, Biomes switches on Land and Sea, Rivers and faults switches on Water and rivers, and Regions, Routes and pins and Labels switch on their own layer.
On a narrow canvas the layer toggles (groups 3 to 5) fold into one Layers menu, in the same order, whose tooltip says how many are on ("Layers: 10 of 12 shown"). A group's row in the menu switches its whole group, with its layers indented below it. The view filters, Detail, Thematic layers and the zoom buttons stay outside the menu.
The Regions and Labels menus
Regions lists every layer set of the map with its layers indented below it, and Labels lists every label style the map's names use, then No style (names with no label style). Untick a row to hide it: a layer's regions, or every name in that label style. A set's row switches all its layers. All at the top shows everything, or hides everything when all is shown. A button is partly lit when only some of its rows are on.
Fills, at the foot of the Regions menu, draws regions with their fills. Off, every layer is drawn as its borders alone, at full strength, which is often clearer over the terrain.
What these menus hide is not drawn, picked or exported, and the names left are placed with the room it frees. Your choices are saved with the map. A new label style or layer starts shown.
Detail level
A map populated by Generate can hold thousands of places, and a world map cannot show them all at once. The Detail menu in the map controls chooses how much is shown:
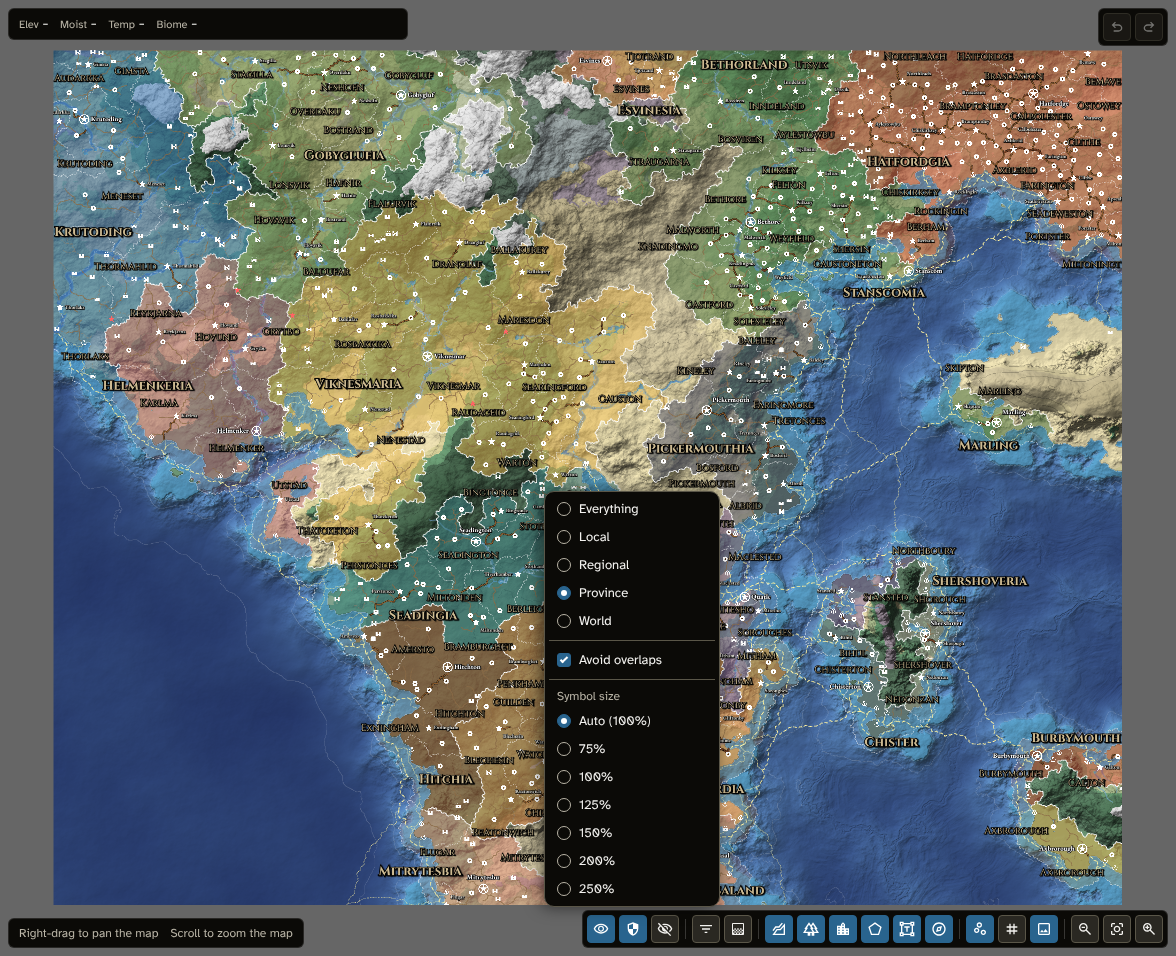
The Detail menu over the generated world map at Province: the five levels, Avoid overlaps and Symbol size.
| Level |
Pins shown (with the default styles) |
Names shown |
Political layers shown |
| World |
Capitals and cities |
Capitals' and cities' |
Realms |
| Province |
Also large towns, castles, fortified towns and ports, ruined capitals and cities |
Also duchies' |
Also duchies |
| Regional |
Also towns, ruins and abandoned castles, and landmarks |
Also counties', large towns', castles', fortified towns', ports' and landmarks' |
Also counties |
| Local |
Also market towns and large villages |
Also towns', market towns', ruins', abandoned castles' and the ruined places' |
Everything |
| Everything |
Everything, including villages |
Everything |
Everything |
Local is for a regional map that still covers a large area: it adds the market towns and large villages of a fill-in (see Fill in) and the names of the smaller places, and leaves the villages for Everything.
- Pins: each pin style has a Detail level (the level from which its pins are shown) and a Name detail level (the level from which their names are), set in its inspector (see Styles and icons). So a kind of place appears one level before its name. A pin you placed with no style is always shown, as is its name.
- Regions: the layers of a set made by Generate (Political) show by their depth, with their names: the top layer at World, the next at Province, the next at Regional. Layers of other sets are always shown.
- Routes are shown at every level: a road leading beyond what is shown invites a closer look.
What a level hides is neither drawn nor picked, and an export shows the map at its detail level. The level is saved with the map. A run of Generate, a fill-in, and a new regional map start the map at the level that suits its scale (the most detailed one whose places are still well apart). A map saved before Local existed keeps what it showed: one left on Everything stays on Everything, and its villages still appear only there.
Avoid overlaps
With Avoid overlaps on (the default), names are placed so they don't cover each other or the pins:
- a place's name tries eight positions round its pin, starting on its right;
- a region's name tries several places inside its region, deepest first;
- a route's name sits above or below its line, half way along first, then nearer one end;
- a natural feature's name, from Name natural features, stays inside its feature, and a river's follows a stretch of its river (see Where names go);
- names keep clear of the scale bar and the decorations;
- the most important names go first: capitals and cities, then realm names (which always show, and push a place's name aside if they must) with the oceans and seas, then mountain ranges, gulfs, lakes and duchies, then counties and named routes, then the other places with the hills and land areas, then rivers and the other routes, and bays last.
A name with no room is left out. In the Labels tool it shows faintly while you are editing labels, so you can drag it to a place of your own, and the Labels list marks it No room (its Kind of label filter has With no room). A label you have dragged keeps its place.
Turn Avoid overlaps off to draw every name at its first position, whatever it covers. The choice is saved with the map, and exports follow it.
Symbol size
Symbol size sets how large pins and names are drawn, on top of their own sizes:
- Auto (the default) draws them at 100% on a map made in New map, and larger on a regional map, by how closely it shows its world, up to 250%. A regional map holds far fewer places for its size than its parent, so its names can be larger and still have room. The menu shows the value ("Auto (163%)").
- 75% to 250% set the size yourself.
It changes how everything is drawn, so a larger size gives names less room among themselves. It is saved with the map, and exports follow it.
Thematic layers
A map populated by Generate keeps what its last run worked out for every part of the world. The Thematic layers menu in the map controls draws it over the map: one colour layer at a time, and the trade lines on their own or beside it:
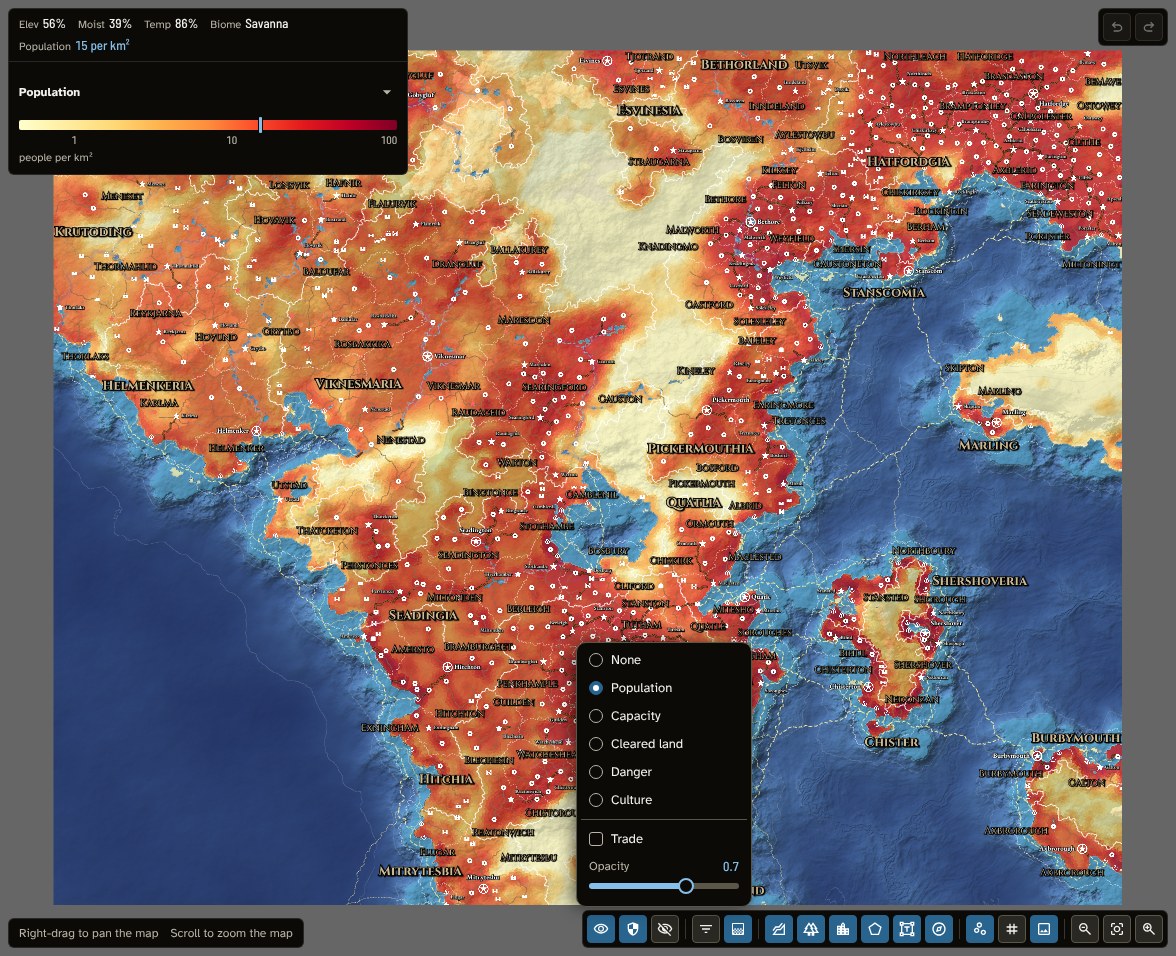
Population at 70% with the region fills off: the information bar reads the value under the pointer, and the legend marks it.
- None draws no layer.
- Population: how many people live on each area of land, from the empty wilds (palest) to the most crowded farmland and cities (darkest red). It reads in the map unit (see New map), for example "12 per km²".
- Capacity: how many people the land could feed on each area, from its soil, climate, rivers and fishing (deepest green for the richest land). It shares Population's scale, so where Capacity is darker than Population there is room for more people.
- Cleared land: the share of the land cleared for fields and pasture rather than left wild, from 0% to 100%. Clearing spreads out from towns and along roads.
- Danger: the share of the people lost to raiders and strife, from 0% to 100% (deepest purple). It is highest on contested borders and far from towns and castles, and rises with the strife of the age.
- Culture: the culture most of the people belong to, in that culture's colour, paler where several peoples live together. Its legend lists the cultures (as they were named in the run), and marks the one under the pointer; the information bar gives the culture and its share of the people, for example "Hillfolk (72%)". It shows the run's cells as they are, without blending, since a culture cannot be half of one and half of another. The row can be chosen once the map has a culture of its own (see Cultures) and has been generated since.
- Trade, below the colour layers, can be ticked on its own or beside one. It draws the trade of the last run along its roads, rivers and sea lanes: the wider the line, the more trade passes along it, in four classes (Light, Moderate, Heavy and Major, each measured against the map's busiest route), and its colour shows how the goods travel (orange by road, green by river, purple by sea). The busiest lines are drawn on top.
- Opacity, at the foot of the menu, sets how strongly the colour layer covers the map, from 0.1 to 1 (0.7 to start).
The graded layers' scales are the same on every map, so the same colour always means the same value.
The colour layer covers the land only, and sits under the rivers, regions, routes, pins and names, so they stay readable over it. The trade lines are drawn over the routes they follow and under the pins and names. While Trade is shown, every route is drawn fainter, so the trade lines stand out; routes are drawn at full strength again once it is hidden. Exports draw the routes the same way. Region fills tint it: switch off Fills in the Regions menu to see it clearly. The run's values are worked out on a grid of cells about 25 km across, and the graded layers blend between them, so they change smoothly rather than in steps (near the map's edge a layer can show a cell's own value as a block).
The information bar and the legends: while a colour layer is shown, the information bar gives its value under the pointer (a dash on water, off the map, or where the run holds nothing). While the trade lines are shown, it names the line under the pointer, for example "Major sea trade". The legend below shows the layer's colours on its scale, with ticks and the unit, and a marker at the value under the pointer (or, for Culture, the cultures with the one under the pointer picked out). The trade legend shows the four widths and the three colours, with the class under the pointer picked out. Each shown layer has its own legend; click the arrow on a legend's title to fold it away, and again to bring it back. When the map has changed since the run (the Generate panel says it is out of date), the legend says the layer comes from the last run.
Before a run the menu's layers cannot be chosen, and the menu says why: generate the map first. A regional map keeps a copy of its parent's run over its area, so it shows the parent's layers until it is generated itself, each legend saying they come from the run of the map it was cut from. They are worked out on the parent's cells, so a closely cut regional map shows them coarser than its own detail. A regional map cut before regional maps kept their parent's run gets a copy when it is opened, if its parent is saved and still holds the run its content came from; otherwise the menu says to generate it or cut it again. A run made with an earlier version of the module may lack what a layer needs; its row then says to generate again.
While the Influences tool is open, its painting is drawn over Capacity or Danger in the colour layer's place, and the menu says so. While the History tool shows an earlier age, Culture shows that age's peoples and the other layers, kept for the present only, cannot be chosen. While the Travel tool is open, its day bands take the colour layer's place: the colour layers are set aside until you leave it, and Opacity sets how strongly the bands cover the map.
The chosen layers and the opacity are saved with the map, and the PNG and scene exports draw them as you see them (without the legends). The 3D view never shows thematic layers. Panning or rescaling the terrain's noise in Terrain moves the run's values with the land and the regions, in the same undo step.
The 3D view
The 3D view button is among the occasional tools on the rail, below the stages. Click it to see your map in 3D; click it again to go back to the flat map.
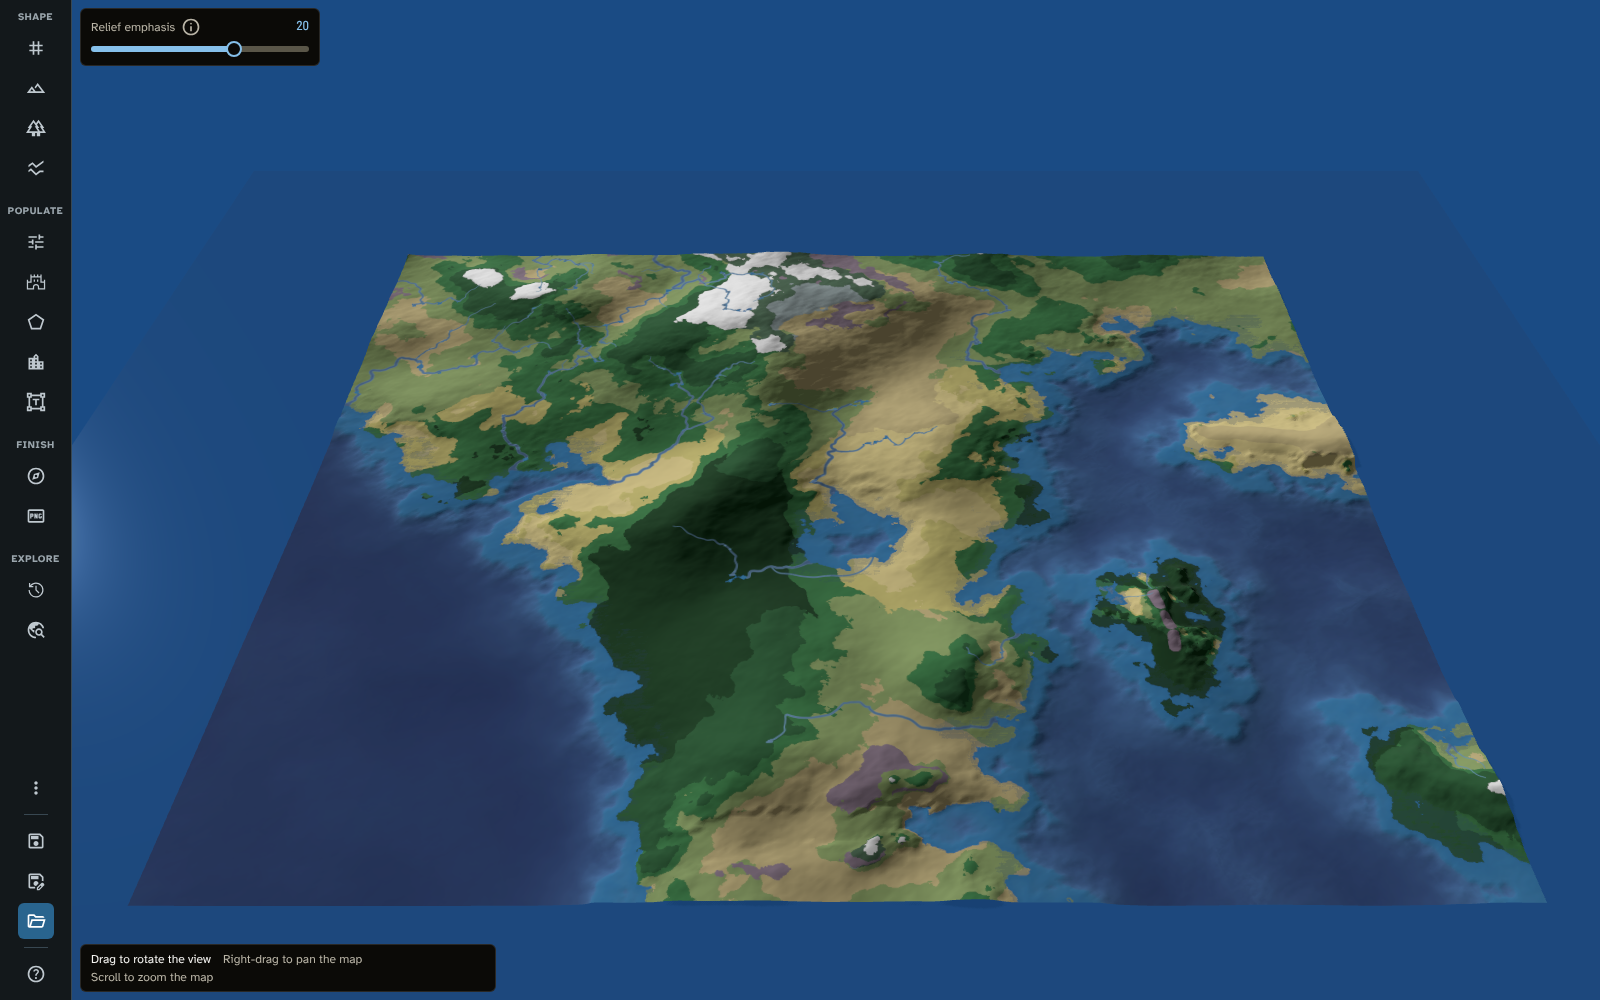
The 3D view of the tutorial's world, with Relief emphasis at the top and the 3D hint at the bottom.
The map is draped over its own terrain as you see it on the canvas: biomes on land and on the seabed, the water coloured by depth with your water settings, and rivers (your own rivers included) painted onto the ground. Lakes lie flat at their surface, and Pack ice sits on top of the sea. Layers you have switched off in the map controls stay off, and switching off Water and rivers also removes the sea's surface. Slopes are lit by the 3D scene's own light, which comes from the north-west as the flat map's relief shading does.
The 3D view is for looking only: it changes nothing on the map and is never exported. It is built when you open it, so to see later changes, close it and open it again. While it is open, the tool's panel, the bar and the canvas overlays are hidden, except the hint and the 3D view's own setting.
- Moving the view: the hint lists the 3D view's own actions: drag to rotate the view, right-drag to pan and scroll to zoom.
- Relief emphasis: a slider in the top start corner, shown only in the 3D view. It sets how strongly the light picks out land that rises gently over large areas, such as wide plains and long inland slopes. The terrain's heights don't change, only how it is lit. It runs from 0 to 30 (the default is 20), changes the view as you drag it, and is saved with the map. Double-click it to put back the default. Dragging or scrolling over the slider doesn't move the view.
The shortcuts sheet
Press ? (when you are not typing in a field) to open the Keyboard and mouse shortcuts sheet: every mouse and keyboard action, by tool and mode, with the shortcuts that work everywhere at the top. The same lists are in Help, one tool at a time.
Tips
- Before exporting, use the map controls to switch off what you don't want in the image or scene.
- Switch off Relief shading and Elevation to judge biome colours on their own, or switch off the biome layers to see the shape of the land.
- If something you placed doesn't show, check its layer in the map controls, the view filters, and the Detail level (a pin whose style's detail level is above the map's is hidden).
- On a busy world map, set Detail to World or Province while you work on the realms, and to Everything to check the towns.
Related: Getting Started, Map Making Tools, Generate, Export, Help